Locks
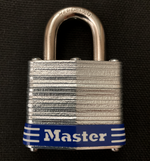
Master Lock No. 3 padlock.
Although there seems to be a lot of people beginning their lockpicking training on padlocks, a double deadbolt or a cheap double euro cylinder can be a better choice; by sawing it in halves, you get two training locks. Gut them (just watch for the skeletonized cores!) and you can progressively pin them to learn your way around the keyway. This also saves you pain of learning security pins right at the beginning - just use standard drivers at the start and start adding security pins into the mix when you are ready.
Tools
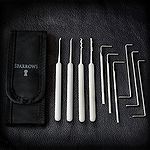
Sparrows Kick Start set of lockpicks, turning tools, and carrying case.
To begin to learn Single Pin Picking (SPP), at least two tools are needed: one to manipulate the pins and one to rotate the lock plug. A pick with a hook profile is often recommended for SPP. It is generally recommended to use a turning tool that fits in the keyway without blocking access to the pins while still providing feedback and control of the rotation.
Listed here are a few suppliers where hobby lockpickers frequently buy these tools
It is easy to make some tools yourself
Other useful stuff
Practice
Practice Locks
Exercises
The following section provides exercises to help new lock pickers develop their new skills. Like with many other activities, it's recommended to learn good habits from the start instead of unlearning bad habits later. These exercises try to support such a good start.
Navigation
Angling the lock pick
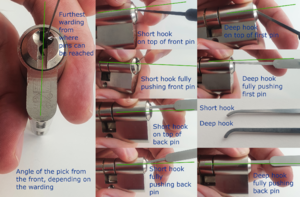
Some pick angles in a Wink Haus lock. Select to enlarge.
The lock pick often needs to be angled to navigate the lock smoothly. The general idea is that you can move the pick around in the lock without scraping the sides of the pick against the lock, as this can take useful feedback away. This often means the pick needs to be angled clockwise or counterclockwise a few degrees. See the picture, which illustrates this and other angles.
- An exercise that can help is to insert the pick in the keyway, holding it so lightly it almost slips from your fingers. You will typically see that the pick automatically angles clockwise or counter clockwise, depending on the keyway. This exercise is recommended without using a tensioner at first.
Typically the pick requires an angle of 5 or 10 degrees.
Also, in general, pins need to be manipulated without disturbing other pins. This generally means the back of the pick should be as far away from the pins as possible, while the tip is able to manipulate one pin at a time.
- You can try to slide the back of the pick against the furthers ledge within the lock that still allows the tip to access the pins. Now if you use the tip of the pick to push the first pin, while levering the back of the pick on the furthest possible ward, see what an angle the pick has when it just touches the pin and what angle the pick has when it pushed the first pin fully. This exercise is recommended without using a tensioner at first.
It is possible that the angles differ by even 90 degrees. Note that the pins in the back of the lock require a significant smaller angle.
Feeling where you are
While lock picking it is generally important to know which pin you are touching and, perhaps more importantly, to know if you are touching a pin. One reason picks break with beginners is that by accident the lock itself is pushed by the pick instead of the pin.
An excersise that can help with knowing where you are is the following:
- Slide the pick in the lock with the tip touching the lock body just in front of the first pin. You can typically feel how the surface of the lock feels very smooth.
- Sliding the pick further into the lock you will feel the tip bump into the first pin. Possibly you can feel a very small rough edge of the pin chamber just before bumping into the pin
- Now, with the back of the pick touching the furthest possible ledge (ward) in the lock, angle the pick slowly more until the tip of the pick can move further into the lock, moving on top of the first pin. How does it feel? Does it feel round or pointy? Is it smooth like the first part of the lock or does it feel different?
- Press the pin down by levering the back of the pick against the furthest ward. Can you feel the pick tip entering the pin chamber a bit at some point?
- Move the pick tip forward again. Possibly you can feel the rough edge of the pin chamber on the other side of the first pin.
- You should now be between the first and second pin. Is the surface as smooth as the first part of the lock? Do you feel how it feels very different from the tip of a pin?
- Continue moving further to the back of the lock, paying attention to the angle the pick needs to make to push the pins and the different surface structures you can feel inside the lock. How many pins does the lock have?
Picking
Tensioning
Different levels of tension on the lock make a big difference in picking. A lot of tension makes the feedback of the lock more clear, but moving the pins precisely hard. Very light tension makes it easy to manipulate the pins but can make it difficult to detect feedback (for example, without accidentally manipulating the pins). In the end it's all about the lock and tension needs to be adjusted depending on the situation. The following exercises are intended to give an initial idea of the range of tension.
Minimum tension
- Without tension slide the tip of the pick across the pins from the back to the front, slightly pressing each pin. Notice the spring tension from the pins.
- Apply tension, so light that the tensioner almost falls out of the lock.
- In case of a padlock: Padlocks typically have springs that push the core back to their starting position. If you work with a padlock, check the amount of tension you need to turn the core until it stops turning due to the pins blocking further rotation. Feel how much tension you need to need to rotate the core, just to the point where the core stops rotating when the pins block it but not more tension
- The tension you have should be so little that you just cannot pick with it. Try to move the pick from the back of the lock to the front again, brushing over the pins and feel if you have the same spring tension from the pins. Do you feel a pin that seems like a speed bump in the road compared to the others you brush over? Does it feel more solid? If yes, try to reduce the tension a bit until you can't feel that anymore.
- Now purposely, while brushing with your pick from the back of the lock to the front over the pins many times, minimally increase and decrease the tension. If the tension is such that you feel one pin acting like a speed bump while the other pins don't and you know that if you slightly decrease the tension that speed bump effect is gone, then you found the minimum tension you need to pick this lock.
Tension on the binding pin
For this exercise it helps, if you have one, to set your practice lock up with only one pin chamber (only one key pin, driver pin and a spring). Without a practice lock, remember and apply the exercise to the speed bump pin of the previous exercise.
- Tension the lock with the minimal tension that we discovered in the previous exercise.
- Now, while leveraging on the warding of the lock with the back of the pick, feel how little pressure the pick has to provide on the pin to make it move. Release the pressure on both pick and tensioner and repeat this a few times.
- Now apply a bit more tension on the lock and feel again what that does with the pressure from the pick that is needed to move the pin. (Note: don't go to extremes as it can break your pick)
- Try this exercise with lighter and heavier tension.
- Apply heavy tension to the lock and put light pressure on the pick. The pin shouldn't move with this combination.
- Now slowly release tension until, with constant pick pressure, the pin starts to move. Can you alternate tension such that the pin move slowly a little bit, stops with heaver tension and continues to move when the tension is decreased again? How many times can you move and pause the pin until it moved its maximum?
Pin states
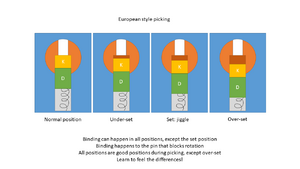
EU orientation pin states. Select to enlarge.
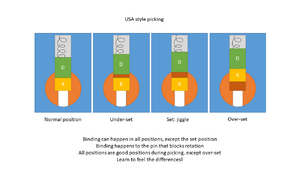
USA orientation pin states. Select to enlarge.
After knowing where you are in the lock, it's very valuable to know what the state of the pins in the lock is. For a quick recap of the pin states, see the diagrams on the side for the orientation of your lock while picking. The following
- On the binding pin (see previous exercise), try to under-set the pin.
- Feel the feedback of the pin. Can you indeed feel it's solid (EU style) or the key pin flops around without any spring involved (USA style)?
- Try to set the pin. Can you feel the typical set-jiggle? The (very) subtle movement where the spring pushes back against the pick?
- After confirming the set with the jiggle, can you over-set the pin and feel the feedback changed again? USA orientation the pin key pin doesn't fall back down. EU style the pin ends up lower than the key can push it. Try to get that feedback from the pin.
- Reset the lock, under-set the binding pin, feel the feedback, set it, feel the feedback and move on to the next binding pin to pick the lock. Concentrate on feedback understanding instead of opening the lock.
" 'Jiggle Test' and the Four Fundamental Pin States"(Video). naswek. 8 December 2020.
Tool Check
Disassembly
- Remove the cam or C-clip.
- Insert the key and turn the plug 45-90 degrees.
- Withdraw the plug from the cylinder. (A plug follower is recommended)
OR
- Remove the chamber casings and take out each pin-stack individually
- Remove the cam or C-clip.
- Withdraw the plug from the cylinder.
Books


